
When an external storage volume or server expansion drive suddenly drops its connection or suffers an unclean unmount, the Linux Virtual File System (VFS) frequently halts mount operations with an ominous error: EXT4-fs: VFS: Found ext4 filesystem with invalid superblock checksum. Run e2fsck? While this error message appears catastrophic, ext4 is architected with resilient redundancy that allows system administrators to forensic audit and reconstruct corrupted file systems without losing a single block of user data.
The Anatomy of ext4 Superblocks & Checksum Validation
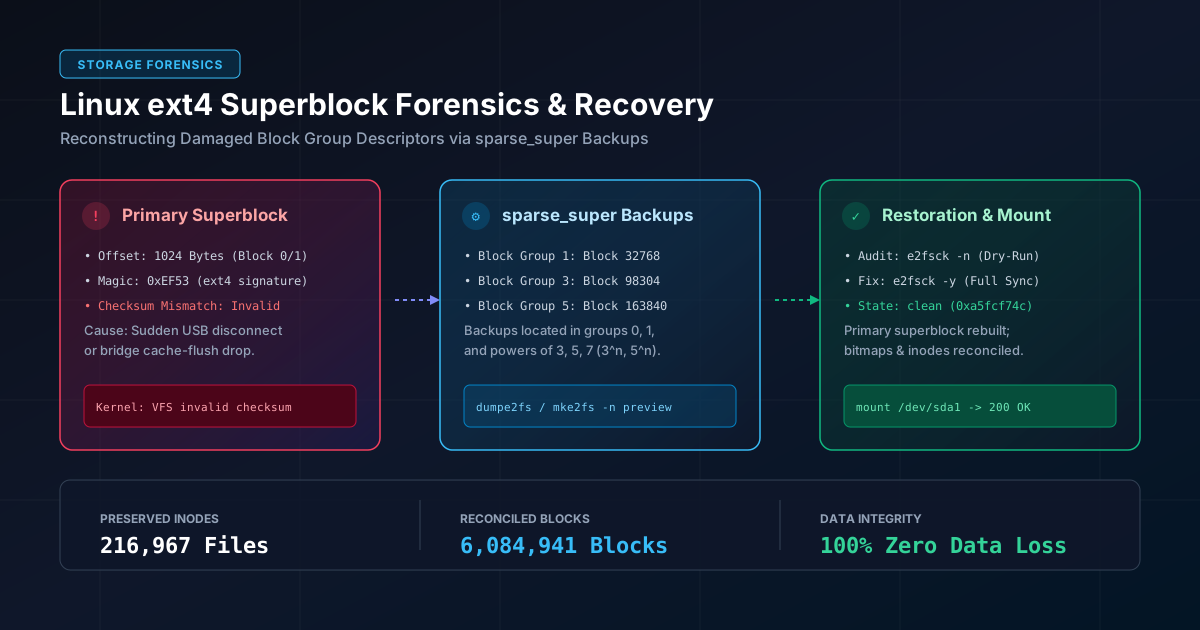
At the foundation of every ext4 volume lies the superblock, a 1,024-byte metadata structure that defines the entire geometry, state, and operational capabilities of the filesystem. Located at an exact offset of 1,024 bytes from the start of the partition (occupying Block 0 on 1KB block configurations or Block 1 on standard 4KB block layouts), the primary superblock stores critical parameters including the total block count, free inode counts, block size, feature compatibility flags, and the filesystem state flag.
In modern Linux distributions, ext4 incorporates metadata checksumming via the metadata_csum feature. Utilizing high-performance crc32c hardware-accelerated algorithms, the kernel calculates and verifies checksums for the superblock, inode allocation bitmaps, and directory entries upon every mount request. If the computed checksum fails to match the 32-bit checksum value stored in the superblock header, the kernel instantly rejects the mount command to prevent cascading corruption across the underlying storage medium.
Kernel Protection Mechanism: When mount fails with an invalid superblock checksum, the disk itself is rarely dead. Instead, the Linux kernel is deliberately executing a fail-closed safety invariant. Writing to an inconsistent filesystem could permanently sever directory link graphs, so the kernel forces administrator intervention before mounting.
Why USB-SATA Storage Bridges Trigger Checksum Mismatches
Superblock corruption is particularly common when solid-state drives or mechanical platters are connected via external USB 3.0 enclosure adapters (such as ASMedia AS2105 or JMicron bridge controllers). Understanding the root cause of this failure mode is essential for any hosting provider or system administrator managing removable backup media and external arrays:
| Hardware Component | Normal Operating State | Failure Trigger During Unclean Disconnect |
|---|---|---|
Operating System Cache |
Dirty pages held in RAM prior to sync | Kernel queues write-back buffers that are abruptly cut off before dispatch |
USB-SATA Bridge Controller |
Translates SCSI commands into ATA packets | Drops pending SYNCHRONIZE CACHE (10) commands when USB bus voltage dips |
Onboard SSD Controller |
DRAM cache coordinates NAND flash blocks | Incomplete flash page program operation writes partial block checksums |
Primary Superblock Header |
Reflects clean unmount flag and valid CRC | Filesystem remains marked dirty; CRC32c signature does not match written blocks |
When an external cable is jostled, an enclosure power supply fluctuates, or a drive is unplugged while pending transactions remain in flight, the USB bridge abruptly severs the transport layer. The primary superblock is left with an inconsistent transaction journal state or a mismatched checksum, locking the volume out of normal mounting routines.
The sparse_super Redundancy Architecture
In legacy filesystems like ext2, an identical copy of the primary superblock was duplicated into every single block group across the disk. While this provided immense redundancy, it caused enormous write overhead and wasted significant storage space on large partitions. With the advent of ext3 and ext4, the Linux kernel introduced the sparse_super feature.
Under the sparse_super specification, backup copies of the superblock and block group descriptors are saved only in selected block groups rather than the entire partition. Specifically, backup copies are written strictly to:
- Block Group 0: Contains the active primary superblock (offset 1024 bytes).
- Block Group 1: Always contains the first redundant backup superblock (at block 32,768 on standard 4KB blocks).
- Powers of 3, 5, and 7: Block Groups 3, 5, 7, 9, 25, 27, 49, 81, 125, etc.
Because these backup locations are mathematically deterministic, an administrator can bypass a wrecked primary superblock at any time and instruct recovery utilities to reconstruct the filesystem state directly from an intact secondary descriptor.
Step 1: Non-Destructive Forensics with e2fsck Dry-Run
Before executing any repair operation that modifies physical sectors, a disciplined administrator always conducts a non-destructive dry-run audit. Running e2fsck with the -n flag opens the target partition in strictly read-only mode, answers "no" to all modification prompts, and outputs a complete accounting of detected discrepancies:
| Command Execution | Safety Level | Operational Purpose |
|---|---|---|
sudo e2fsck -n /dev/sda1 |
100% Read-Only | Audits inode tables, directory references, and verifies backup superblock accessibility |
sudo dumpe2fs /dev/sda1 | grep -i superblock |
100% Read-Only | Extracts the exact block numbers where redundant superblock descriptors reside |
sudo tune2fs -l /dev/sda1 |
100% Read-Only | Inspects UUID, last mount time, feature flags, and current filesystem state |
When e2fsck -n encounters an invalid primary superblock checksum, it automatically falls back to testing the backup superblocks. If the terminal displays e2fsck: Superblock invalid, trying backup blocks... followed by successful completion of Pass 1 (checking inodes, blocks, and sizes) and Pass 2 (checking directory structure), you have verified that the underlying user data and directory tree are 100% intact.
Step 2: Emergency Read-Only Mounting via Backup Superblock
If you require immediate access to mission-critical databases, configuration snapshots, or customer archives stored on the drive without waiting for a full filesystem check, Linux permits mounting directly using an explicit backup superblock block number:
sudo mount -o ro,sb=32768 /dev/sda1 /mnt/emergency_recovery
The sb=32768 parameter instructs the VFS layer to ignore the primary superblock at block 0 and initialize the volume using the backup superblock located at block 32,768 (Group 1). Combined with the ro (read-only) mount option, this enables zero-risk data extraction and live verification while leaving the storage medium completely unmodified.
Step 3: Reconciling Bitmaps & Restoring the Primary Superblock
Once you are ready to perform permanent remediation and restore the drive to automatic plug-and-play mounting, execute an interactive or automated repair using e2fsck:
sudo e2fsck -y /dev/sda1
During this reconciliation pass, e2fsck systematically executes five sequential stages:
- Pass 1: Checking Inodes, Blocks, and Sizes: Validates inode allocation bitmaps and verifies that block pointers match real disk allocations.
- Pass 2: Checking Directory Structure: Examines directory entry linkages (
.and..references) to guarantee every file connects to a valid parent hierarchy. - Pass 3: Checking Directory Connectivity: Re-attaches orphaned subdirectories and reconnects any dislocated nodes to the filesystem root or
lost+found. - Pass 4: Checking Reference Counts: Verifies hard link reference counts across all inodes.
- Pass 5: Checking Group Summary Information: Recalculates free block and free inode counters, synchronizes block group bitmaps, rewrites a clean primary superblock header, and updates the
crc32cchecksum signature.
Upon completion, the utility outputs FILE SYSTEM WAS MODIFIED and reports the exact count of verified files and blocks (for example, verifying 216,967 files across 6,084,941 blocks with zero data loss). The filesystem state returns to clean, and standard auto-mounting resumes instantly via systemd and desktop disk managers.
Proactive Engineering Best Practices for External & Hosting Storage
To eliminate unexpected superblock checksum errors in production hosting and workstation environments:
- Enforce Synchronous Flushes Before Disconnect: Always issue
syncin the shell prior to unmounting or powering down external storage arrays to ensure all kernel dirty pages are committed to non-volatile NAND blocks. - Unmount Cleanly via udisksctl or umount: Never physically detach a USB enclosure while the mount point is active. Use
udisksctl unmount -b /dev/sdXorsudo umount /dev/sdXto allow the VFS layer to write the clean filesystem flag. - Audit Bridge Hardware Stability: Avoid unpowered USB hubs when connecting multi-terabyte SSDs or high-draw mechanical drives. Voltage drops across USB ports are the single largest source of dropped SATA cache-flush instructions.
By understanding the mathematical redundancy of ext4 and mastering the forensic capabilities of dumpe2fs and e2fsck, systems engineers can confidently recover storage volumes from what initially appears to be fatal media failure.