
Deploying a public Linux VPS without defensive hardening leaves it vulnerable to automated credential stuffing, brute force scans, and privilege escalation exploits within minutes of coming online. In this checklist, we enforce a Defense-in-Depth security architecture conforming to Center for Internet Security (CIS) Level 1 benchmarks.
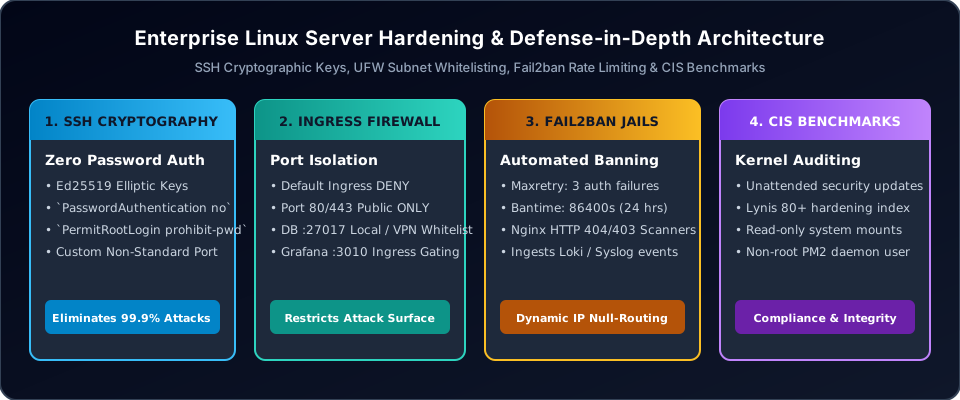
1. Step 1: Cryptographic SSH Key Enforcement
Disable all password-based SSH authentication and force modern elliptic curve keys in /etc/ssh/sshd_config:
# /etc/ssh/sshd_config Hardening
PasswordAuthentication no
ChallengeResponseAuthentication no
PermitRootLogin prohibit-password
PubkeyAuthentication yes
X11Forwarding no
MaxAuthTries 3
ClientAliveInterval 300
ClientAliveCountMax 2
KexAlgorithms curve25519-sha256,curve25519-sha256@libssh.org
Ciphers chacha20-poly1305@openssh.com,aes256-gcm@openssh.com
MACs hmac-sha2-512-etm@openssh.com,hmac-sha2-256-etm@openssh.com
Generate keys using ssh-keygen -t ed25519 -a 100 on your local workstation and verify connection before restarting the SSH daemon via sudo systemctl reload sshd.
2. Step 2: Uncomplicated Firewall (UFW) Ingress Isolation
Enforce a strict default-deny ingress policy and expose only necessary public web services:
# Reset and enforce default deny
sudo ufw default deny incoming
sudo ufw default allow outgoing
# Allow HTTP and HTTPS
sudo ufw allow 80/tcp
sudo ufw allow 443/tcp
# Restrict SSH to custom management subnet if applicable
sudo ufw allow 22/tcp
# Enable and inspect
sudo ufw enable
sudo ufw status verbose
3. Step 3: Automated Rate Limiting with Fail2ban
Configure Fail2ban to monitor authentication logs and Nginx HTTP error streams, automatically dropping offending IP addresses via iptables:
# /etc/fail2ban/jail.local
[DEFAULT]
bantime = 86400
findtime = 600
maxretry = 3
banaction = ufw
[sshd]
enabled = true
port = 22
filter = sshd
logpath = /var/log/auth.log
[nginx-botsearch]
enabled = true
port = http,https
filter = nginx-botsearch
logpath = /var/log/nginx/*error.log
maxretry = 2
4. Step 4: CIS Auditing & Unattended Security Upgrades
Enable automatic unattended security patching and perform periodic compliance auditing:
# Enable automated security updates
sudo apt install unattended-upgrades update-notifier-common
sudo dpkg-reconfigure --priority=low unattended-upgrades
# Verify /etc/apt/apt.conf.d/50unattended-upgrades
Unattended-Upgrade::Allowed-Origins {
    "${distro_id}:${distro_codename}-security";
};
Unattended-Upgrade::AutoFixInterruptedDpkg "true";
Unattended-Upgrade::MinimalSteps "true";
Unattended-Upgrade::Automatic-Reboot "false";
5. Step 5: Shared Memory & Filesystem Mount Hardening
Attackers who gain restricted shell access frequently execute malicious binaries out of world-writable directories such as /tmp and /dev/shm. Protect these mountpoints by adding defensive flags to /etc/fstab:
# /etc/fstab Hardening
tmpfs /tmp tmpfs defaults,nosuid,nodev,noexec,mode=1777 0 0
tmpfs /var/tmp tmpfs defaults,nosuid,nodev,noexec,mode=1777 0 0
tmpfs /dev/shm tmpfs defaults,nosuid,nodev,noexec 0 0
The noexec flag prevents the execution of any binary or script directly from the directory, neutralizing common web application shell drops.
6. Step 6: Kernel Self-Protection & Network Security via Sysctl
Harden the Linux network stack against IP spoofing, SYN flood attacks, and ICMP redirect manipulation by configuring /etc/sysctl.d/50-security.conf:
# Reverse Path Filtering (Mitigate IP Spoofing)
net.ipv4.conf.all.rp_filter = 1
net.ipv4.conf.default.rp_filter = 1
# Ignore ICMP Broadcast Requests & Smurf Attacks
net.ipv4.icmp_echo_ignore_broadcasts = 1
# Disable ICMP Redirect Acceptance (Mitigate Man-in-the-Middle)
net.ipv4.conf.all.accept_redirects = 0
net.ipv4.conf.default.accept_redirects = 0
net.ipv6.conf.all.accept_redirects = 0
# Prevent Rogue Source-Routed Packets
net.ipv4.conf.all.accept_source_route = 0
net.ipv4.conf.default.accept_source_route = 0
# Protect Hardlinks and Symlinks against TOCTOU Race Conditions
fs.protected_hardlinks = 1
fs.protected_symlinks = 1
# Maximize Address Space Layout Randomization (ASLR)
kernel.randomize_va_space = 2
7. Step 7: Automated Compliance Auditing with Lynis
Regularly audit system compliance against CIS benchmarks using Lynis, an open-source security auditing tool:
# Install and run Lynis security audit
sudo apt install lynis
sudo lynis audit system --quick
# Review Lynis hardening index and generated warnings
grep "Hardening index" /var/log/lynis.log
grep "WARNING" /var/log/lynis.log
Aim for a Lynis Hardening Index score of 80 or higher on production web hosting environments.
Frequently Asked Questions
Is changing the default SSH port (22) sufficient for server protection?
Changing the SSH port to a non-standard port (e.g., 2222) reduces automated bot scans in access logs, but it is merely security through obscurity. A simple port scan with Nmap will immediately discover the listening SSH service. Cryptographic key enforcement, disabling root password login, and Fail2ban rate limiting provide genuine security.
How do I unban an administrator IP address accidentally locked out by Fail2ban?
If an administrator enters incorrect credentials and triggers a jail ban, connect from a secondary whitelisted IP or the hosting provider out-of-band console, then execute:
sudo fail2ban-client set sshd unbanip 203.0.113.50You can also permanently whitelist administrative office IP subnets by adding them to the ignoreip directive in /etc/fail2ban/jail.local.
What is the difference between CIS Benchmark Level 1 and Level 2?
CIS Level 1 provides defensive security controls that can be applied with minimal risk of breaking normal operating software. Level 2 enforces defense-in-depth measures (such as strict mandatory access control policies, restricted kernel modules, and aggressive filesystem isolation) that require customized application tuning to prevent operational conflicts.
Why is Address Space Layout Randomization (ASLR = 2) critical?
Setting kernel.randomize_va_space = 2 randomizes the memory addresses of the stack, VDSO page, shared memory libraries, and data segment. This prevents memory corruption exploits (such as buffer overflows and Return-Oriented Programming attacks) from predicting executable memory targets.
Summary & Cloud Security Baseline
Hardening a Linux server requires a layered defensive posture. By implementing cryptographic SSH key pairs, strict ingress firewall isolation, Fail2ban intrusion prevention, protected shared memory mounts, and CIS benchmark auditing, systems administrators ensure production instances remain resilient against automated exploitation.
Deploy Pre-Hardened Cloud VPS
Deploy hardened Linux instances with built-in DDoS filtering, NVMe storage, and isolated virtual networks on WinWinHost.
Explore Hardened Cloud VPS →